The remaining few weeks of the course will provide an introduction to deep learning using PyTorch, an open-source machine learning framework developed by AI researchers at Meta. The torch
library is not pre-installed in the Anaconda distribution, so you must add the torch
and torchvision
libraries yourself. You can do this by searching for them in the available libraries in your Anaconda environment.
If you've installed the torch
library correctly, the following code should print a $3x2$ tensor of zeros:
import torch
import torchvision
import matplotlib.pyplot as plt
x = torch.zeros(3, 2)
print(x)
tensor([[0., 0.], [0., 0.], [0., 0.]])
In torch
data are stored in tensors, which share many similarities with numpy
arrays. The simplest type of tensors is akin to a 1-dimensional array (ie: a vector), but tensors can contain arbitrarily many dimensions.
As an example, we can use tensors to preserve the spatial structure of images. The code below reads the flattened form of 1000 examples from an image data set known as Fashion MNIST, which consists of 28x28 pixel grayscale images of 10 different types of fashion items:
### Read the flattened data
import pandas as pd
fash_mnist = pd.read_csv("https://remiller1450.github.io/data/fashion_mnist_train.csv")
## Train-test split
from sklearn.model_selection import train_test_split
train_fash, test_fash = train_test_split(fash_mnist, test_size=0.1, random_state=5)
### Separate the label column (outcome)
train_y = train_fash['y']
train_X = train_fash.drop(['y'], axis=1)
test_y = test_fash['y']
test_X = test_fash.drop(['y'], axis=1)
### Convert to numpy array and reshape to 900 by 28 by 28
mnist_unflattened = train_X.to_numpy()
mnist_unflattened = mnist_unflattened.reshape(900,28,28)
## Convert from numpy array to torch tensor
mnist_tensor = torch.from_numpy(mnist_unflattened)
## Check shape of the first image (ie: index position 0 in dim 0)
print(mnist_tensor[0,:,:].shape)
torch.Size([28, 28])
This code converts the training data, which was originally a pandas
data frame, into a numpy
array so that it could be reshaped it to have the dimensions 900, 28, 28. These dimensions correspond to the number of training examples, and the pixel layout of each example.
We can check to see if this worked as intended by viewing one of the images, which should be a $28x28$ slice of our array/tensor:
## Display the 9th image
from skimage import io
io.imshow(mnist_unflattened[8,:,:])
plt.show()
C:\Users\millerry\Anaconda3\lib\site-packages\skimage\io\_plugins\matplotlib_plugin.py:150: UserWarning: Low image data range; displaying image with stretched contrast. lo, hi, cmap = _get_display_range(image)
Grayscale images are atypical, and it's much more common to encounter color images. Consequently, most machine learning methods developed for image data are designed to work with tensors with the dimensions: ($N$ images, $C$ color channels, $w$ pixels, $h$ pixels).
To see how to manipulate tensors into this format, we'll work with the following example image:
## Load an color image and display it
my_img = io.imread("https://upload.wikimedia.org/wikipedia/commons/6/66/Polar_Bear_-_Alaska_%28cropped%29.jpg")
io.imshow(my_img)
io.show()
## Check the image's shape
my_img.shape
(565, 563, 3)
We can see that the image was read as an array with dimensions (565, 563, 3). Thus, it will need to be reshaped to fit the standard format of ($N$ images, $C$ color channels, $w$ pixels, $h$ pixels).
## Convert to tensor and check the shape
polar_bear = torch.from_numpy(my_img)
print(polar_bear.shape)
## Move third dimension (color channels) to the first dimension
polar_bear2 = torch.movedim(polar_bear, source=2, destination=0)
print(polar_bear2.shape)
## Add a new first dimension (noting that this is the only sample)
polar_bear_final = torch.unsqueeze(polar_bear2, dim=0)
## The tensor is now in "standard" format and ready for ML models
print(polar_bear_final.shape)
torch.Size([565, 563, 3]) torch.Size([3, 565, 563]) torch.Size([1, 3, 565, 563])
Next, you should recognize that many architectures are designed to handle inputs with certain dimensions. Thus, it is useful to know that the pixel dimensions of an image tensor can be resized to match those expected by the model's architecture.
The example below resizes our $565x563$ image to $128x128$ pixels:
from torch.nn import functional
polar_bear_resized = functional.interpolate(polar_bear_final, size = (128,128))
print(polar_bear_resized.shape)
torch.Size([1, 3, 128, 128])
The interpolate()
function smooths over a higher resolution image to reduce its size, but this can sometimes result in a loss of important information. Thus, we should check to ensure that resizing didn't lead to any material distortions of the image:
import matplotlib.pyplot as plt
polar_img_format = torch.movedim(polar_bear_resized[0], source=0, destination=2)
plt.imshow(polar_img_format)
plt.show()
The resized image still looks like a polar bear, so we can view the procedure as a success. Additionally, you might note that imshow
expects the image to be formatted with the shape: ($w$ pixels, $h$ pixels, $C$ color channels), so we needed to move the color channel dimension of our polar bear tensor.
Finally, you may want to save the resized image in a data folder for future use (as it's easiest to work with a folder of images with the same size). The code below demonstrates one of many possible ways to achieve this:
from torchvision import transforms
from PIL import Image
transformed = transforms.ToPILImage()
transformed(polar_bear_resized[0]).save('polar_bear1.png')
Question #1
The zipped folder at this link contains 50 images of cats.
interpolate
function.torch
¶In this section we'll set up the architecture of a simple custom neural network by creating our own subclass of nn.Module
named my_net
. If you aren't familiar with object-oriented programming, the key things to know are:
nn.Module
is a base class for all neural networks in PyTorch. Subclasses created from this class inherit a number of functions and methods that we'll use during the training and evaluation of this network.def __init__(self)
and super(my_net, self).__init__()
, are used to set up my_net
as a subclass of nn.Module
. Here the building blocks of the network, which are from nn.Module
are defined.forward
function organizes the network architecture by defining how an input tensor is forward propagated through the network.Our example is designed for the Fashion MNIST data. So, the network's expected input is an $N$ by $28$ by $28$ tensor. You should note that forward propagation begins by flattening this tensor, hence there are $28*28 = 784$ input features in the first linear layer.
from torch import nn
class my_net(nn.Module):
## Constructor commands
def __init__(self):
super(my_net, self).__init__()
## The network will flatten each 28x28 image to 784 features
self.flatten = nn.Flatten()
## It will apply the following functions sequentially
self.linear_relu_stack = nn.Sequential(
nn.Linear(784, 512), # A fully connected linear layer - 784 inputs to 512 neurons
nn.ReLU(), # The ReLU activation function
nn.Linear(512, 512),
nn.ReLU(),
nn.Linear(512, 10),
)
## Function to generate predictions
def forward(self, x):
## First it flattens x (this is flatten() as we defined above)
x = self.flatten(x)
## Then it applies "linear_relu_stack()" (also defined above)
scores = self.linear_relu_stack(x)
## The output of the final layer is returned
return scores
Question #2
self.flatten(x)
is removed from the network's forward
method? Briefly explain the issue.nn.Linear()
to output a 10-dimensional tensor.The operations performed by the stack of functions in nn.Sequential
may seem like a black box, but the ability to construct a custom architecture using a variety of pre-defined building blocks is a core strength of torch
. What follows will briefly explain each of these building blocks and its role in our simple network.
First, nn.Flatten
will take any tensor and output a 2-dimensional tensor where the first dimension (dim 0) from the original tensor is preserved and the remaining dimensions are collapsed into a single dimension.
In our example, this keeps each training sample separate, but stores all of the predictive features in a single dimension (discarding the spatial structure of the images). In our next lab we'll introduce types of layers that can accommodate the spatial structure of image data.
## Create random tensor reflecting three 28 x 28 images
random_tensor = torch.rand(3,28,28)
## Flatten it and check the size
flatten = nn.Flatten()
flat_data = flatten(random_tensor)
print(flat_data.size())
torch.Size([3, 784])
Next, nn.Sequential
is used to create an ordered sequence that alternates between nn.Linear
and nn.ReLU
. Here nn.Linear
applies a linear transformation to a set of inputs such a certain number of outputs (what we've called $\mathbf{z}^i$ in class) are produced. Then, nn.ReLU
activates the values stored in these neurons (thereby creating what we've called $\mathbf{a}^i$ in class).
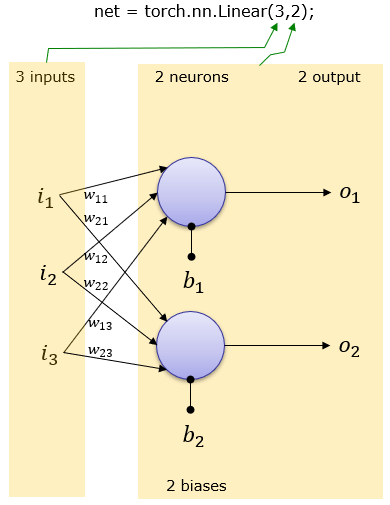
As an example, we can visually understand the meaning of nn.Linear(3,2)
using the diagram below:
## Sorry, this is the easiest way to show images in HTML generated from a Python notebook
from IPython.display import HTML
HTML('<img src="https://www.sharetechnote.com/image/Python_Pytorch_nn_Linear_i3_o2_01.png">')
Note that this diagram using $i$ to represent input value, and $o$ to represent each output value. Additionally, you should recognize that the numeric values of these weights and biases are typically initialized to random values, but will be learned from the data during training.
We can further understand this structure by creating a simple network containing only this layer and printing the weights/biases:
trial_net = torch.nn.Linear(3,2)
print(trial_net.weight)
print(trial_net.bias)
Parameter containing: tensor([[-0.4376, -0.3568, -0.3188], [-0.3368, 0.2385, 0.4446]], requires_grad=True) Parameter containing: tensor([-0.1783, 0.0599], requires_grad=True)
Here you might notice that the weight and bias tensors contain an attribute requires_grad
that is set to True
.
This setting means that quantities involved in the gradient of these parameters will be calculated and stored whenever these functions are used, which is required to train the parameters in these portions of the network.
Later on we'll learn about transfer learning, in which we'll set this attribute to False
in order to preserve certain weights in pre-trained networks.
Moving on, recall that nn.ReLU
introduces non-linearity via the rectified linear unit activation function). This function simply maps an input to itself if the input is positive and map it to zero otherwise.
Below is a quick demonstration of nn.ReLU
:
## Create example hidden layer input
example_hidden_input = torch.FloatTensor([1.1, 2.2, -3.3, -0.1])
## Apply ReLU to input
nn.ReLU()(example_hidden_input)
tensor([1.1000, 2.2000, 0.0000, 0.0000])
Question #3
nnReLU
contained in our network's nn.Sequential
have any parameters that are learned from the data?my_net
? Show the details of your calculation.To learn effective values of the weights and biases from the training data, we need to begin by defining the following tuning parameters:
We also must specify an appropriate cost function as well as one of PyTorch's built-in optimization algorithms (that is compatible with the chosen cost function).
## Training parameters
epochs = 200
lrate = 0.01
bsize = 100
## Cost Function (cross entropy loss since the outcome is categorical)
cost_fn = nn.CrossEntropyLoss()
## Initialize the model
net = my_net()
## Set up the optimizer (Stochastic Gradient Descent)
optimizer = torch.optim.SGD(net.parameters(), lr=lrate)
To help facilitate the passing of training examples into the network during learning, we'll use the DataLoader
utilities that are part of PyTorch:
from torch.utils.data import DataLoader, TensorDataset
y_tensor = torch.Tensor(train_y)
train_loader = DataLoader(TensorDataset(mnist_tensor.type(torch.FloatTensor), y_tensor.type(torch.LongTensor)), batch_size=bsize)
This code creates a TensorDataset
object containing a tensor of predictors (which come from the data in mnist_tensor
) and a tensor of outcomes (y_tensor
, which we've already defined). Then, this TensorDataset
object is used to create a DataLoader
object that can be used to pass batches of data into the network.
The code provided below will train our network, which we named net
, on the data contained train_loader
using the iterable nature of DataLoader
objects:
import numpy as np
## Initial values for cost tracking
track_cost = np.zeros(epochs)
cur_cost = 0.0
## Loop through the data
for epoch in range(epochs):
cur_cost = 0.0
correct = 0.0
## train_loader is iterable and contains info about the batch sizes
for i, data in enumerate(train_loader, 0):
## This is the input tensor and labels tensor for the current batch
inputs, labels = data
## This clears the gradient calculated using the previous batch
optimizer.zero_grad()
## This is the forward pass
## The input tensor is given to the network to get outputs
outputs = net(inputs)
## This calculates the cost for the current batch
## nn.Softmax is used because net outputs prediction scores and our cost function expects probabilities and labels
cost = cost_fn(nn.Softmax(dim=1)(outputs), labels)
## This is the backward pass
## The gradient is computed starting from the cost function
cost.backward()
optimizer.step()
## Track the current cost (accumulating across batches)
cur_cost += cost.item()
## Store the accumulated cost at each epoch
track_cost[epoch] = cur_cost
# print(f"Epoch: {epoch} Cost: {cur_cost}") ## Uncomment this if you want printed updates
We can graph the cost by epoch to see if the weight estimates in our network have converged.
Because we are using batches of data (stochastic gradient descent), we're looking for the cost to flatten out with some noise. Additionally, you should remember that this is the cost calculated using the training data, so we should expect it to continue to improve with additional training, but this might not reflect improved performance on new data.
import matplotlib.pyplot as plt
plt.plot(np.linspace(0, epochs, epochs), track_cost)
plt.show()
From the cost curve it seems that our network has learned something during training.
Next, we'll demonstrate how to calculate the accuracy (or any other type of score) using a PyTorch model that has been trained.
## Initialize objects for counting correct/total
correct = 0
total = 0
# Specify no changes to the gradient in the subsequent steps (since we're not using these data for training)
with torch.no_grad():
for data in train_loader:
# Current batch of data
images, labels = data
# pass each batch into the network
outputs = net(images)
# the class with the maximum score is what will be the predicted class
_, predicted = torch.max(outputs.data, 1)
# add size of the current batch
total += labels.size(0)
# add the number of correct predictions in the current batch
correct += (predicted == labels).sum().item()
## Calculate and print the proportion correct
print(correct/total)
0.7877777777777778
This accuracy score shows that the model has learned some, since we'd expect only 10% accuracy by chance. However, it might also reflect overfitting, so let's see how the model does on the test data.
The code below reformats our test data into a TensorDataset
, then puts into its own DataLoader
object:
## Make test outcomes into a tensor
test_y_tensor = torch.Tensor(test_y.to_numpy())
### Convert to numpy array then reshape
test_unflattened = test_X.to_numpy().reshape(len(test_y),28,28)
## Convert test images into a tensor
test_tensor = torch.from_numpy(test_unflattened)
## Combine X and y tensors into a TensorDataset and DataLoader
test_loader = DataLoader(TensorDataset(test_tensor.type(torch.FloatTensor), test_y_tensor.type(torch.LongTensor)), batch_size=bsize)
We can now modify our previous loop to use test_loader
:
## Repeat evaluation loop suing the test data
correct = 0
total = 0
with torch.no_grad():
for data in test_loader:
images, labels = data
outputs = net(images)
_, predicted = torch.max(outputs.data, 1)
total += labels.size(0)
correct += (predicted == labels).sum().item()
print(correct/total)
0.62
A few comments to end this example:
KFold
function in sklearn
and SubsetRandomSampler
in PyTorch to perform k-fold cross validation.The zipped folder at this link contains 50 images of cats and 100 images of dogs (chihuahua breed).
I have resized these images for you, so you won't need to worry about their dimensions. I've included my code for this procedure (for the cats images) if you are curious (perhaps for the purposes of your final project). This code was adapted from this StackOverflow answer and it is not necessary that you run it on your own PC (I also did not share the dogs folder).
path = 'OneDrive - Grinnell College/Documents/cats/'
import os
for item in os.listdir(path):
if os.path.isfile(path+item):
im = Image.open(path+item)
f, e = os.path.splitext(path+item)
imResize = im.resize((64,64), Image.Resampling.LANCZOS)
imResize.save(path + 'new/' + item, 'JPEG')
The code provided below will load all of these images into a numpy array:
import os
import matplotlib.pyplot as plt
path = 'OneDrive - Grinnell College/Documents/cats_dogs/'
img_names = os.listdir(path)
images = np.empty(shape = (150, 64, 64, 3))
for idx, name in enumerate(img_names):
img_name = path + name
# Use you favourite library to load the image
image = plt.imread(img_name)
images[idx] = image
These images are ordered and for me they remain ordered when they are read, so I'll set up the target labels manually. You should double-check that your images get read in order (which seems to differ by operating system) and setup the label vector differently if necessary.
## We'll use 1 = cat, 0 = dog
classes = [1,0]
## Repeat an appropriate number of times (print to check)
labels = np.repeat(classes, [50, 100], axis=0)
labels
array([1, 1, 1, 1, 1, 1, 1, 1, 1, 1, 1, 1, 1, 1, 1, 1, 1, 1, 1, 1, 1, 1, 1, 1, 1, 1, 1, 1, 1, 1, 1, 1, 1, 1, 1, 1, 1, 1, 1, 1, 1, 1, 1, 1, 1, 1, 1, 1, 1, 1, 0, 0, 0, 0, 0, 0, 0, 0, 0, 0, 0, 0, 0, 0, 0, 0, 0, 0, 0, 0, 0, 0, 0, 0, 0, 0, 0, 0, 0, 0, 0, 0, 0, 0, 0, 0, 0, 0, 0, 0, 0, 0, 0, 0, 0, 0, 0, 0, 0, 0, 0, 0, 0, 0, 0, 0, 0, 0, 0, 0, 0, 0, 0, 0, 0, 0, 0, 0, 0, 0, 0, 0, 0, 0, 0, 0, 0, 0, 0, 0, 0, 0, 0, 0, 0, 0, 0, 0, 0, 0, 0, 0, 0, 0, 0, 0, 0, 0, 0, 0])
Below we'll confirm things worked using one of our images. Note that we need to cast the pixel intensities to integers so that they are properly handled by imshow
.
# Image #11, which should be a cat
plt.imshow(images[10].astype('uint8'))
plt.show()
Question #4
images
and labels
. See the second example in the documentation if you've never used this function when the outcome/target variable has already been separated from the predictors.DataLoader
objects.